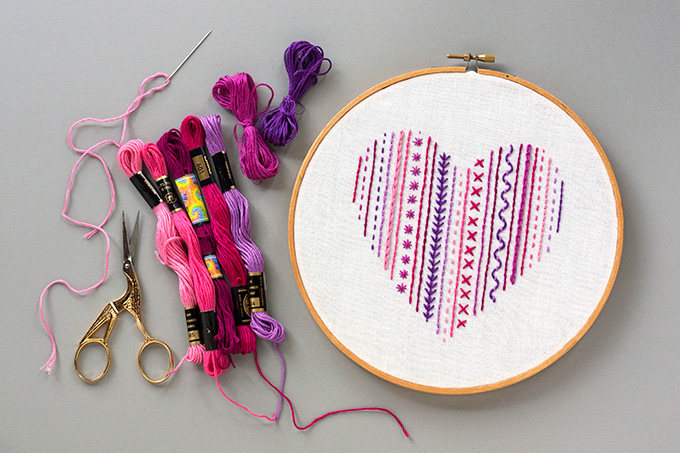
HEART EMBROIDERY SAMPLER


MATERIALS:
- 8-inch diameter embroidery hoop:
The Heart Sampler pattern was created for an 8” hoop but if you would like to make a different size sampler, you can shrink or enlarge the pattern provided to fit your hoop. I’d recommend not going smaller that 6” for this pattern. - Hand-sewing/embroidery needle:
You’ll want to use a medium sized needle with a sharp point and a long opening, or eye, at one end, for easy threading. - Embroidery floss (7 different colors):
Embroidery floss comes in a small bundle or skein and there are tons of colors available (check your local craft store). A length of floss is made up of six smaller strands or plies that are twisted together. You can use all of them or divide them up and use two, three or four plies for a thinner line. For this project, we’ll be using all 6 plies on all our stitches EXCEPT the star stitch, where we will use only three plies. - 12”x12” square of fabric (quilter’s cotton or linen works best):
The looser the weave of your fabric, the more forgiving it can be when taking out stitches and starting over. A finer weave fabric is more likely to show holes from your needle. - Sewing scissors:
Sewing scissors are sharp and used only for cutting thread and fabric. Avoid using your sewing scissors to cut paper or anything else beside fabric so that you don’t dull the blades. - Iron & ironing board
- Fine-lead pencil (or nonpermanent fabric marking pen):
- Crayola Light-Up Tracing Pad (or light table or sunny window)
- Washi tape (or masking tape or pins)
- Paper cutter (or scissors & ruler)
- Heart Sampler Pattern
Other Useful Tools:
- A needle threader (helpful when you find yourself struggling to thread your needle!)
- Thimble (can prevent you from stabbing yourself in the finger with your needle. Ouch!)

INSTRUCTIONS:
Step One: Prep the Pattern & Fabric
Kumaşınızı boyuta göre kesin. Benimkini 12 ”x12” kare olacak şekilde kestim, bana fazladan bol kaldı. Ayrıca 10”x10” kumaş parçasıyla da kurtulabilirsiniz. Sıcak bir ütü kullanarak kumaşınızı kırışıklardan kurtarmak için bastırın.
How to use the pattern:
Use the lines of the pattern as a guide for your stitches. You’ll notice that each line has an assigned number to indicate which stitch to use. In this tutorial I will demonstrate how to make each stitch. There are a few stitches that are used more than once (like the running stitch, back stitch and chain stitch). Feel free to fill in these stitches as you go along.
Step Two: Transfer the Pattern to Fabric Using the Light Method
The easiest way to transfer a design onto a light-color fabric is to trace it. Place the square paper pattern face down onto the center of the square fabric and secure with washi tape or pins. Flip over and use a light table or my favorite tool, the Crayola Light-Up Tracing Pad, to transfer the pattern to the fabric using a fine lead pencil or nonpermanent fabric marking pen. You can also tape your fabric/design to a sunny window and use the natural light to trace.


Step Three: Prepare the Fabric & Floss
Place the fabric into your embroidery hoop making sure the design is centered. To make your fabric taut, spread it over the smaller inside hoop and fit the larger outside hoop over the top with your fabric in between. Tighten the little screw on the outer hoop and gently pull on the edges of the fabric until you have a taut surface to work with.

Threading your needle:
Threading the needle can be a little tricky, especially when using all six plies of floss. It may help to slightly dampen your finger and twist the end of the thread into a point, or try squeezing the floss ends flat between your thumb and forefinger. Then slide the needle’s eye onto the floss (instead of pushing the floss through the eye). If all else fails, use a needle threader.
Once you’ve threaded your needle, knot the longer end of the floss by first wrapping it around your finger, then roll it off and tighten into a knot.
Step Four: Stitching the Design

1. Running Stitch: To begin stitching the Heart Sampler, let’s start with the most basic embroidery stitch- the Running Stitch. Begin at the center dashed line of the heart pattern. Starting at the bottom, pull the threaded needle to the front of the fabric at A (see photo above). Then return to the back of the fabric at B. The distance from A to B can be as long or short as you want. For this project, I recommend making small, even stitches of equal length. End your last stitch so that your needle is to the back of the fabric and tie off.
Tying off:
On your last stitch, return the needle to the back of the fabric. To tie off, pass the needle under a previous stitch creating a loop. Bring the needle back through the floss loop, and tighten. I recommend pulling the thread gently when tying off to ensure that the knot ends up snuggly next to your fabric (and not half an inch away). Avoid yanking the floss.
Embroidery Tip!
Your thread will get twisted up as you make your stitches. To correct this problem, hold up the hoop and let the needle and floss dangle straight down so that the strand can untwist itself. Just make sure not to lose your needle!
2. Back Stitch: Move over to the next line on the pattern (from the middle running stitch). Starting at the bottom of the pattern, bring your needle through to the front of the fabric at A (see photo above). Then go backwards and return your needle to the back of your fabric at B. Next your going to move your needle forward, coming up at C. Repeat this process to create consecutive back stitches by once again working backwards, poking your needle through at the end of the previous stitch, then moving your needle forward. Be sure to make small, even stitches of equal length. Once you reach the end of the line (of the pattern), tie off.
3. Cross Stitch: Next we are going to try our first decorative stitch! Starting at the bottom of your pattern, bring your needle through to the front of the fabric at A and then back down again at B (creating a diagonal straight stitch). Next make a second stitch from C to D. Make sure each cross (x) overlap is in the same direction. Once you finish your row and tie off, notice what the back or your stitches look like. The back of a Cross Stitch row should look like the image shown.
4. Threaded Running Stitch: First make a line of small close Running Stitches. End the floss. Start a second floss strand (in a different color) at the same spot as the first line of running stitches, bringing your needle to the front of your fabric at A. Working on the front only, without stitching through the fabric, insert the needle under the first Running Stitch, then through the second Running Stitch. Continue weaving back and forth under the Running Stitches until you reach the end of the line. End floss and tie off.
5. Chain Stitch: Start again at the bottom of the pattern and move your way up. Bring the threaded needle to the front at A. Insert the needle back into the fabric at A and then just poke the needle back up to the front at B. Loop the thread under the needle point then pull the thread through to create your first chain. Begin the next stitch in the same way by inserting the needle back into the fabric at B (now under the loop), coming up at C (outside the loop). Bring the thread around and under the needle point and pull the thread through. On your last stitch, end the chain by inserting your needle into the end of the last chain (outside the loop). Pull the thread through to the back and tie off.
6. Fern Stitch: Fern Stitch consists of three Straight Stitches of equal length radiating from the same central point A. Starting at the top of the pattern and moving your way down, bring the thread through at A and then make a Straight Stitch to B. Bring the thread back through again at point A and make another Straight Stitch to C. Bring the thread back through at point A (for the final time) and make a final straight stitch to D. Repeat this pattern by moving the needle down and coming up through the next center stitch to begin the next three radiating stitches. The center stitch follows the light of the pattern design.
7. Star Stitch: This is an Eight Point Star Stitch. Begin by first making a basic cross stitch. Then make another cross stitch diagonally on top of the first one to form a star.


